i.MX8 Development Board
Note
This page is incomplete and is being revised.
Installing the SOM
Power board without SOM via USB-C
Check the voltages
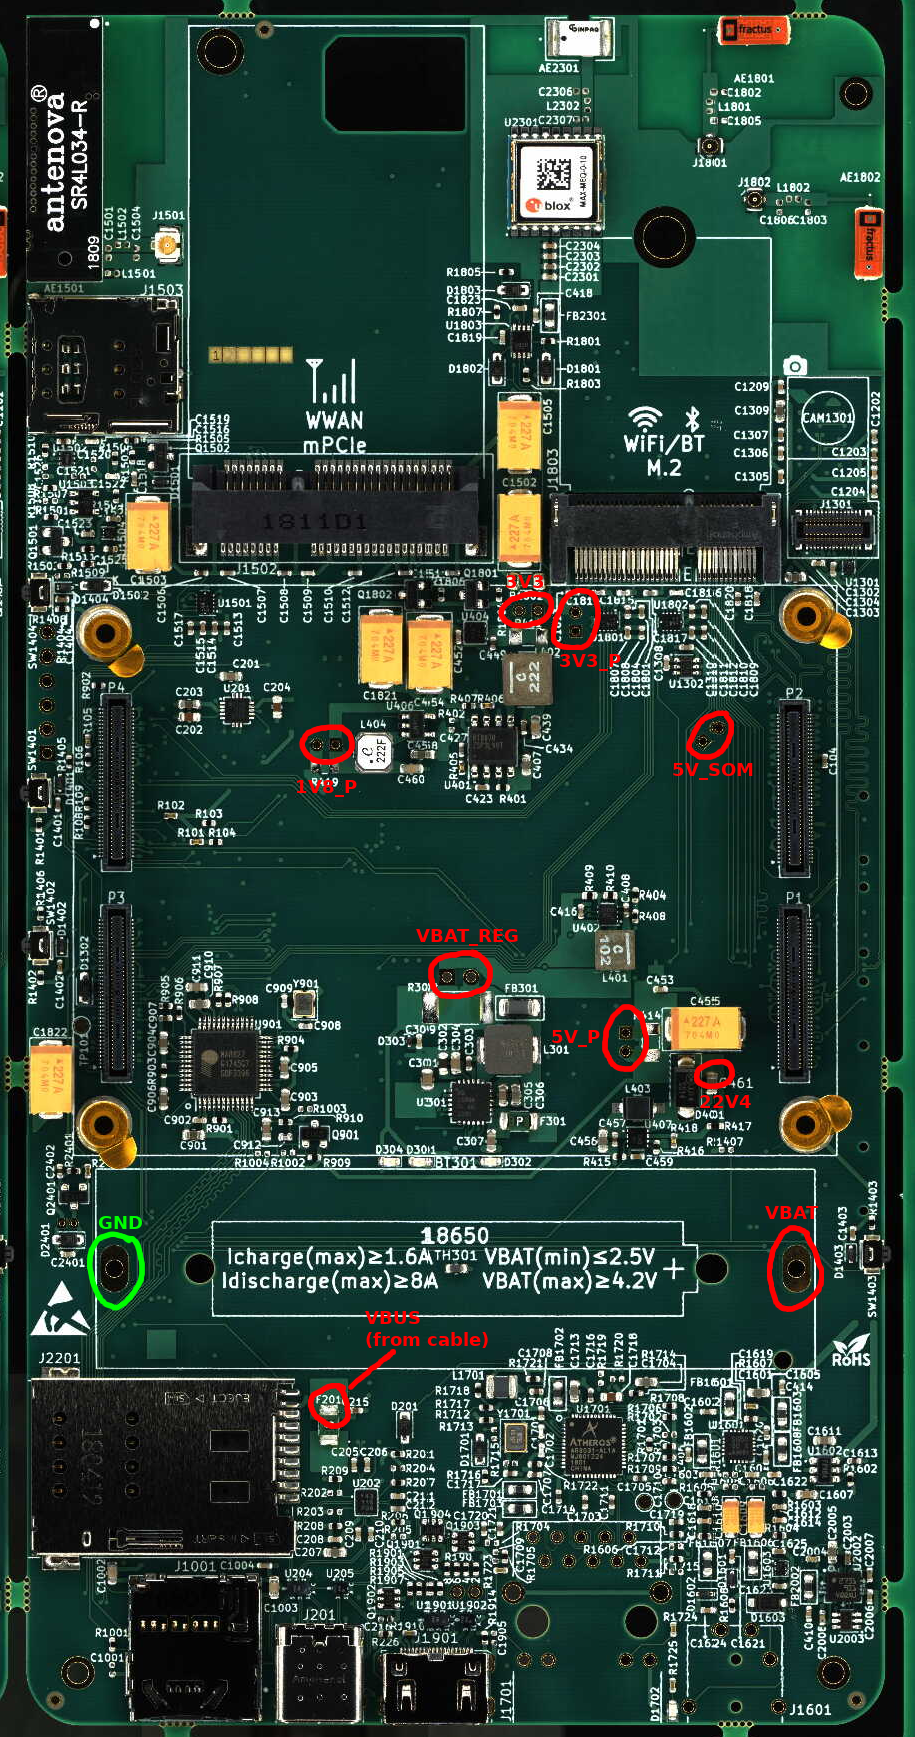
The voltage points to measure (click to enlarge)
| Point | Voltage |
|---|---|
| VBUS | 5.2V |
| VBAT | 4.2V |
| VBATREG | 4.2V |
| 5VSOM | 5.0V |
| 3V3 | 3.3V |
| 3V3P | ~0(without SOM) |
Each voltage is measured against ground (green circle in above image).
Plugin the SOM
Attach USB to serial adapter
Solder in the UART debug plug
Attach USB to serial Adapter
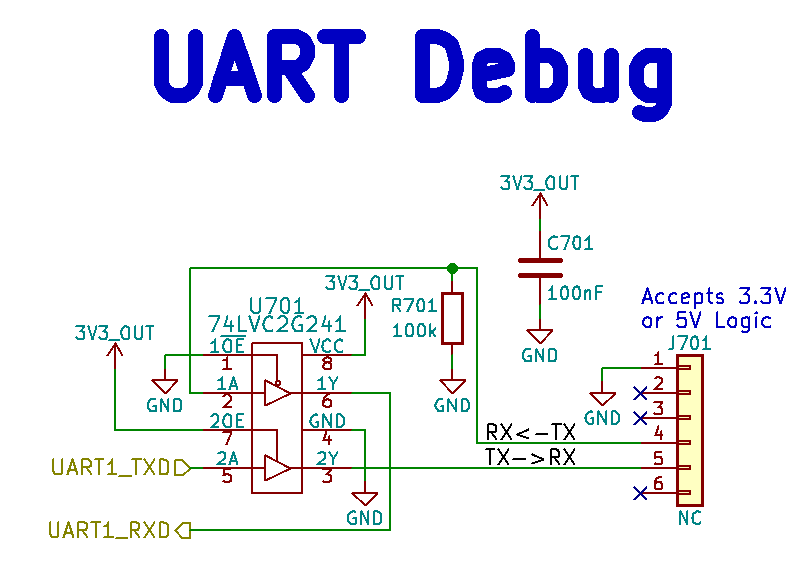
UART pinout
| PIN | Color |
|---|---|
| 1 | black |
| 2 | n/c |
| 3 | n/c |
| 4 | green |
| 5 | white |
| 6 | n/c |
PIN 1 is the one closest to the volume button while PIN 6 is the one closest to the power button.
Power on/off
If the user holds the power button for ~2 seconds then a power down/reboot dialog would pop up; a quick press & release would turn the display on/off. If the button is held for ~5 seconds the SoC triggers an event to shut down, pressing it again for ~2 seconds will turn it back on. The button is also attached to the charge controller’s QON# pin, which when held for ~15 seconds is able to put the dev kit into a “shipping mode” where the charge controller is completely off, or holding it for ~18 seconds will cause it to perform a complete power cycle.
Booting via nfsroot
The SOM comes with a pre-flashed u-boot so you can connect the USB-to-UART-Debug cable and boot the device. Breaking into uboot you can boot using a nfsroot filesystem via
setenv nfsrootboot "setenv bootargs ${args_common} debug root=/dev/nfs ip=:::::eth0:dhcp nfsrootdebug nfsroot=<nfsserverip>:<nfsrootpath>,v3,tcp; dhcp ${loadaddr} Image-librem5-devkit; dhcp ${fdt_addr} librem5-devkit.dtb; booti ${loadaddr} - ${fdt_addr}"
setenv bootcmd run nfsrootboot
saveenv
boot
You need to fill in nfsrootpath and nfsserverip above. At nfsrootpath there needs to be a armhf or arm64 root filesystem which you can e.g. create via Debian’s deboostrap.
For that to work the BOOT MODE switch needs to be set to eMMC (instead of USB).
Installing a minimal Linux on the eMMC
You can use dd to copy a pre-built image onto the eMMC or you can just use
debootstrap to create one from scratch. This can be useful if you don’t
want that many services starting up by default:
e2fsck /dev/mmcblk0p2
mount /dev/mmcblk0p2 /mnt
debootstrap --arch=arm64 buster /mnt
Back in u-boot we can switch to using the rootfs on the eMMC then (we’re still pulling kernel and device tree via tftp though:
setenv emmcboot "setenv bootargs ${args_common} debug root=/dev/mmcblk0p2; dhcp ${loadaddr} Image-librem5-devkit; dhcp ${fdt_addr} librem5-devkit.dtb; booti ${loadaddr} - ${fdt_addr}"
Install uuu
By hand
The NXP mfgtool uuu is required to boot a board that has no bootloader or is otherwise “bricked”. Either download, build and install uuu :
git clone https://github.com/NXPmicro/mfgtools
cd mfgtools
cmake ./
make
sudo make install
Using the convenient script
scripts/build_uuu.sh -i
Download Target Binaries
You can manually download or build the required binaries. There is also a convenience script to download pre-built binaries from the Purism servers.
scripts/fetch_latest.sh -xk
Flash u-boot
Using SDP
The uboot that gets flashed is files/u-boot-devkit-recovery.imx. Put
the “Boot Mode” switch in the USB position:
sudo uuu uuu_scripts/u-boot_flash_librem5-devkit.lst
You can also just boot to u-boot without flashing anything:
sudo uuu uuu_scripts/u-boot_librem5-devkit.lst
From u-boot using tftp
You must have a tftp server setup for this:
setenv ipaddr <tftp server ip>
setenv serverip <target ip addr>
tftp 0x43000000 u-boot-devkit-recovery.imx
mmc write 0x43000000 0x42 0x800
From the kernel command line
Download the u-boot binary u-boot-devkit-recovery.imx:
dd if=u-boot-devkit-recovery.imx of=/dev/mmcblk0 bs=1024 seek=33
Flash eMMC
Using SDP
The eMMC that gets flashed is files/devkit.img . Put the “Boot Mode” switch in the USB position.
This will erase everything on your eMMC:
sudo uuu uuu_scripts/flash_librem5-devkit.lst
Create test initramfs
Download the latest image and kernel
Download the latest kernel and RS9116 out of tree modules.
./scripts/fetch_latest.sh -k
Extract the kernel
The kernel needs to be extracted from the deb for the SDP boot.
./scripts/extract_kernel.sh
Build the test filesystem tarball
This will create a minimal debian rootfs tarball to be used to create an initramfs. If you need additional packages you can add them to the packages variable in the script.
./scripts/create_tarball.sh
Create the initramfs
This will take the tarball created above and customize it to be able to flash the RS9116 module and also adds some test scripts.
./scripts/create_initramfs.sh -t build/test_rootfs.tgz -o files/test_initramfs.img
You can include a locally generated kernel, modules and devicetree as well
./scripts/create_initramfs.sh -t build/test_rootfs.tgz -o files/test_initramfs.img -i <path to kernel>
Boot the initramfs
The initramfs can be booted on a board with an empty eMMC for testing and RS9116 flashing. Ensure the boot mode switch is switched to USB boot. Run the command below and then plug in the USB C port of the devkit.
sudo uuu uuu_scripts/test_librem5.lst
Reflash the RS9116
By default no rsi* modules get loaded. The modules without firmware are in “/lib/modules/<kernel:sub:ver>/drivers/net/wireless/rsi” . The createinitramfs script above adds the rsi firmware and reflash modules in “/usr/src”.
There is a convenience script “flash:sub:rsi.sh” that wiil perform the necessary steps. What the script does is it backs up the rsi modules in /lib/modules, copies the firmware into lib firmware and the modprobes the rsi flashing modules. It replaces the original modules when it’s done.
Run the script on the target to reflash.
root@pureos-test:~# flash_rsi.sh
RS9116 normal operation
To use the RS9116 without flashing just load the modules by hand.
root@pureos-test:~# modprobe rsi_sdio